
|
|
| Did this site save (or help earn) you money? Say thanks with a small donation. |
The
TWI Designjet Documents library presented here as a courtesy of
ComputerCareOnline.com |
![]()
![]()
NOTE: Only a case specialist will predict camera parts.
The stitching procedure has failed (the processor is having problems detecting one and only one image of the stitching wire in the scanned input), and is displayed as system error 32-144 on the touch-screen monitor, or by the following scanner LED light sequence on the scanners front panel:
Figure 1: Scanner front-panel LED's
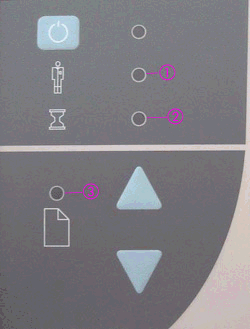
1- Diagnostic LED
2- Wait LED
3- Ready LED
Possible causes are a dirty glass plate or one of the cameras is out of adjustment. Follow the steps listed below to determine the actual cause of the failure and to replace the appropriate parts.
The steps below are designed to achieve remote resolution of the issue. If the troubleshooting steps below appear to resolve the issue, attempt to verify scanner functionality. If the issue persists following the steps below, generate a CSO for service.
WARNING: When cleaning any part of the scanning area, DO NOT use abrasives, acetone, benzene or fluids that contain these chemicals. Do not spray liquids directly onto the scanner glass plate or anywhere else in the scanner. Apply cleaners to lint-free cloths only.
NOTE: Leave the scanner on when cleaning the scan area. Doing so provides better lighting to view of particles on the glass plate and surrounding areas.
Figure 1: Removing the guide plate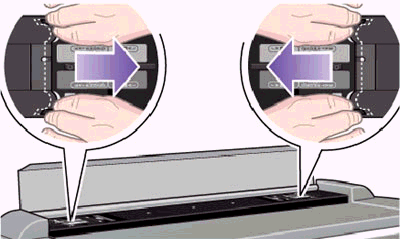
Figure 2: Cleaning the white background assembly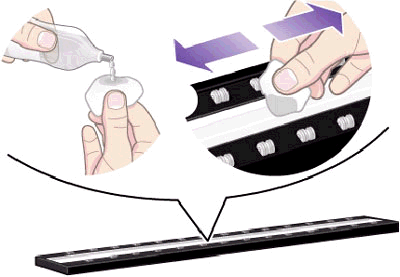
Figure 3: Cleaning the platen rollers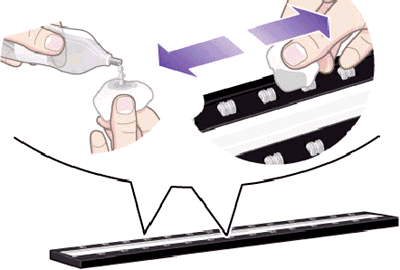
| HP Designjet 815MFP and 4200 Scanner | |
|---|---|---|
Service Patterns (Required) |
||
Optical Pattern (Required) |
Q1261-60038 |
Q1278-60013 |
Main Electronics Board (Required) |
Q1261-60002 |
Q1278-60002 |
Camera Motor |
Q1261-60019 |
Q1261-60019 |
Stitching Wire |
Q1261-60008 |
Q1261-60008 |
NOTE: If removal and installation instructions are needed for reference during any repairs performed, refer to the Service Manual available on the HP Partner Care Web site (http://partner.americas.hp.com/) for review or download.
If any of the troubleshooting steps listed below solve the problem, attempt to verify functionality. If functionality is verified, no additional parts should be replaced.
NOTE: If ANY adjustments have been made to either camera A or B, scanner maintenance MUST be done before the scanner can be used.
Copyright Hewlett-Packard Co. 2001
This information is subject to change without notice and
is provided "as is" with no warranty.
Hewlett-Packard shall not be liable for any direct,
indirect, special, incidental or consequential damages
in connection with the use of this material.
![]()