Did this site save
(or help earn) you money?
Say thanks with a
small donation.
|
The
TWI Designjet Documents library presented here as a courtesy of
ComputerCareOnline.com
The owners of this website have no affiliation to Hewlett Packard nor do we
claim to represent HP
in any way shape or form.
Return
to TWI Documents Library Index Page
|
HP Designjet Multi Roll Feeder - TWI: System Error 0D0000
0D0001, 0D0002, 0D0003

In this document:
KRS document number: BPP90166
Last Updated: 31-Jul-2002
Minimum skill level: 2
A problem with
Channel sensor 1 has been detected. Most common causes are poor cable connections, incorrect sensor positioning, a faulty
Channel sensor or Electronics module. Follow the steps listed below to determine the actual cause of the failure and to replace the appropriate parts.
Error Codes 0D0001 refers to Channel 2 Sensor, 0D0002 refers to Channel 3
Sensor, 0D0003 refers to Channel 4 Sensor
Parts required (part numbers are subject to change)
NOTE: If Removal and Installation instructions are needed for reference during any repairs performed, refer to the HP Designjet Multi-Roll Feeder (for 1000 Series) Service Manual available on the Partner Care Web site for review or download.
Troubleshooting steps
If any of the troubleshooting steps listed below solve the problem, attempt to verify printer functionality by printing several internal prints. If functionality is verified, no additional parts should be replaced.
(To troubleshoot Error Codes - 0D0001, 0D0002, 0D0003 follow the same steps but
substitute the corresponding channel sensor 01 - CH2, 02-CH3 & 03-CH4).
- Turn the printer and the multi-roll feeder Off.
- Locate
Channel Sensor 1, found just above the top Roll (pictured in Figure 1).
Figure 1: Channel Sensor 1
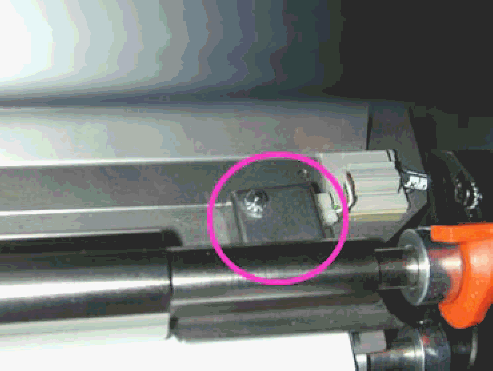
- Check that the Channel Sensor is correctly connected and that the sensor is positioned over the hole in the chassis.
- Turn the printer and Multi-roll feeder On, and attempt to verify functionality.
- If the error continues,
replace Channel Sensor
1 (refer to pg. 4-35 of the HP Designjet Multi-Roll Feeder Service Manual).
- If the error persists, replace the Main PCA
(refer to pg. 4-15 of the HP Designjet Multi-Roll Feeder Service Manual).
- Following the replacement of the Main PCA, perform a Multi-Roll Feeder Calibration as listed below.
NOTE: Printer menu mode must be set to Full to access the Service Tests submenu. To verify, at the Ready prompt, scroll to the Printer Setup icon, and press ENTER. Use the ARROW buttons to scroll to the Utilities menu and press ENTER. Using the ARROW buttons scroll to Menu Mode =. Select Full (if needed) and press the BACK button to return to the Main menu.
Multi-roll feeder calibration
- Turn the printer and multi-roll feeder On. Following initialization, make sure the multi-roll feeder is enabled and detected by the printer (Device Setup · Multi-roll · YES).
- Load media onto roll 1 (use bright white paper, coated media or other media available which is no thicker than 120g/m2). Do not load it into the printer (printer may ask to load the media when detected as new roll).
- Scroll to the Printer Setup menu (icon of printer in lower-right side of the front panel display) and press ENTER.
- Scroll to the Utilities menu, and press ENTER.
- Simultaneously press the UP and ENTER keys.
- Use the ARROW keys to scroll to Service Utilities and press ENTER.
- Scroll to Multi-roll Calib. and press ENTER.
- In the Service Calibrations menu, scroll to Multi-roll Calib. and press ENTER.
- The multi-roll feeder automatically loads roll 1 into the printer, measuring the idle level and reference level. The media is then pulled out of the printer so that the maximum position level is measured. The multi-roll feeder checks these three measured values and reports to the printer whether the calibration was performed correctly or not. If the printer reports the calibration has failed, a potentiometer (Poti) placed in the main electronics, Poti R20, has to be adjusted (instructions listed in Steps 16-18).
- Check if the green LED on the rear side, near the multi-roll serial and parallel connectors, is on. If the calibration in Step 8 was successful and the green LED is on, the calibration was performed correctly (continue with Step 25).
- If the red LED is on or both the red and the green LED's are flashing, the Poti R20 must be adjusted (instructions listed in Steps 16-18). In this case, it is very likely that Step 8 failed with a calibration error.
- Turn the printer and the multi-roll feeder off.
- Unload the media from the printer as follows:
- Remove the front top-cover of the multi-roll feeder
- Raise the printer handles.
- Turn roll 1 away from you to collect part of the media back onto the roll.
- Lower the printer handles.
- Remove the electronics access cover (refer to pages 4-15 of the HP Designjet Multi-Roll Feeder (for 1000 Series) Service Manual), turn it over and re-install it so that it covers only the power supply unit.
- Turn the printer and the multi-roll feeder on.
- Through the front panel, rerun the multi-roll calibration (Service menu, Service Utilities, then Multi-roll Calib). The multi-roll feeder automatically loads roll 1 and performs the calibration (do not worry if it fails).
NOTE: Make sure you take the necessary precautions in order to avoid electrical shock and ESD damages.
- The Poti R20 in the main electronics has to be adjusted (see Figure 2). Using a flat screwdriver, touch the metal casing of the main electronics before starting.
Figure 2: Poti R20 located on the main electronics PCA
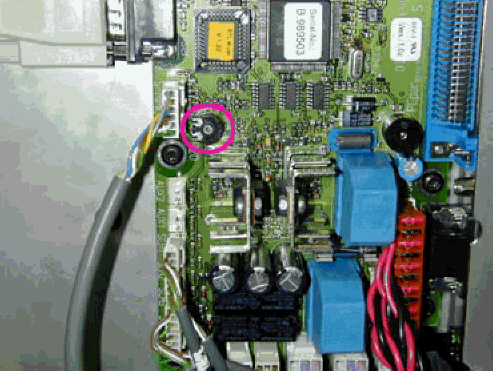
- Slowly adjust the Poti R20 (using a T8 torx driver) until the green LED is on and the red LED is off. Be diligent when doing this because there is a very small window when the green LED is on and the red LED is off.
NOTE: When adjusting Poti 20, try turning in either direction, in small amounts each time to turn the green LED on.
- When only the green LED in on, turn the printer and the multi-roll feeder off.
- Unload the media from the printer as follows:
- Raise the printer handles.
- Turn roll 1 away from you to collect part of the media back onto the roll.
- Lower the printer handles.
- Turn the printer and the multi-roll feeder on and wait until initialization has finished (if the printer requests to configure a new roll do not load any roll).
- Through the printer's front panel, rerun the multi-roll calibration (Service menu, Service Utilities, then Multi-roll Calib). The multi-roll feeder automatically loads roll 1 into the printer, so that the idle level and the reference level are measured again, now with the correct Poti adjustment. The media is then pulled out of the printer so that the maximum position level is measured. The multi-roll feeder checks the three measured values and reports to the printer whether the calibration was performed correctly or not.
- Now the calibration result must be OK; if not, power OFF and repeat the process. Even though the calibration may pass after the second attempt, it is still possible that the red LED is ON.
- Turn the printer and the multi-roll feeder off, and wait 5 seconds. If necessary, install the front top-cover.
- Turn the printer and the multi-roll feeder on, and wait until initialization has finished (if the printer requests to configure a new roll do not load any roll).
- Unload the roll through the printer's front panel.
- Print a test print in order to check if loading and operation works, (if the calibration was not successful, the loading will fail with an error).
Copyright Hewlett-Packard Co. 2001
This information is subject to change without notice and
is provided "as is" with no warranty.
Hewlett-Packard shall not be liable for any direct,
indirect, special, incidental or consequential damages
in connection with the use of this material.
