Did this site save
(or help earn) you money?
Say thanks with a
small donation.
|
The
TWI Designjet Documents library presented here as a courtesy of
ComputerCareOnline.com
The owners of this website have no affiliation to Hewlett Packard nor do we
claim to represent HP
in any way shape or form.
Return
to TWI Documents Library Index Page
|
HP Designjet 1000 Series Printers - TWI: Continuous Self Test Message or Two Dots Appearing on the Front Panel

In this document:

KRS document number: BPP90126
Last updated: 02-Jan-2003
Minimum skill level: 2
During printer initialization, a continuous Self Test message or Two Dots appear on the front panel display. Both issues are related to the printer Firmware and/or the Electronics Module. Follow the steps listed below to determine the actual cause of the failure and to replace the appropriate parts.
NOTE: If the printer is installed on a Multi-Roll feeder accessory, some Multi-Roll disassembly is required to gain access to the printer. Instructions for Multi-Roll disassembly are listed at the bottom of this document for reference.
Parts required (part numbers are subject to change)
NOTE: If the printer is an "A" model, a
Trailing cable must be sent with the rest of the parts listed.
NOTE: The fuse being sent should be used if a poor
Trailing cable connection or a shorted
Trailing cable blows the fuse on the Electronics module. Make sure to properly connect the
Trailing cable or replace a shorted
Trailing cable before installing the new fuse.
Troubleshooting steps
If any of the troubleshooting steps listed below solve the problem, attempt to verify printer functionality by printing several internal prints. If functionality is verified, no additional parts should be replaced.
- Turn the printer off.
- Open the firmware/memory access panel located on the back of the printer.
- Verify that memory is present and installed in the left-most or center slot on "A" model printers (a minimum of 16 MB for the 1050C, 32 MB for the 1055CM). The 1000 series plus printers ("B" model) use the middle and right-most slot for memory (64 MB is required for "B" models), and must be loaded into one of the slots listed above).
- If third-party memory is being used, remove the memory and use the original HP memory DIMM that shipped with the printer.
- Reseat the memory and firmware DIMM's and turn the printer on.
- If the problem persists, turn the printer off.
WARNING: When performing the steps listed below, ensure the printer is turned off every time a DIMM is removed or inserted. Failed to do so may damage the printer or the DIMM.
- Troubleshoot memory DIMM(s) as follows:
- If one DIMM is installed, remove the DIMM and install into the other available memory slot and turn the printer on. If no problems occur, a memory slot on the Electronics module if defective (replace the Emod at customers convenience as printer will still function). If the DIMM fails in the second slot replace the memory DIMM.
- If two DIMM's are installed, remove one DIMM and turn the printer on (note if problem occurs).
- Turn the printer off, remove the DIMM and install the other DIMM into its original slot. Turn the printer on (again note if problem occurs).
- If both DIMM's failed, replace the memory DIMM(s).
- If the memory DIMM(s) fail in only one slot, a memory slot on the Electronics module if defective (replace the Emod at customers convenience as printer will still function with memory in only one slot).
- If memory has been replaced and the error continues, replace the firmware DIMM before continuing with the remaining steps.
- Turn the printer on and attempt to verify functionality.
- If the error reappears, replace the Electronics module/Main PCA (refer to pg. 8 - 25 of the 1000 Series Service Manual).
If printer is an "A" model, replace the
Trailing cable during the Electronics Module replacement. Refer to pg. 8-39 of the 1000 Series Service Manual for removal and replacement instructions.
- Following replacement, perform a Calibrations Backup as listed below.
Constant two dots on the front panel
- Turn the printer off.
- Open the firmware and memory access panel on back of the printer.
- Verify that the firmware DIMM is installed in right-most slot if the printer is an "A" model, if the printer is a "B" model the firmware DIMM is installed in the left-most slot.
- If no DIMM is present, check the memory slots to see if the firmware is installed in the wrong slot.
- Check for oxidization on firmware DIMM contacts or in socket of Electronics Module.
- Reinstall the firmware DIMM.
- Turn the printer on.
- If the problem reappears, turn the printer off and replace the firmware DIMM.
- Following replacement, turn the printer on and attempt to verify functionality.
- If still unresolved, replace the Electronics Module (refer to pg. 8-25 of the 1000 Series Service Manual).
- Following replacement, perform a Calibrations Backup as listed below.
Calibrations backup
NOTE: Printer menu mode must be set to Full to access the Service Tests submenu. To verify, at the Ready prompt, scroll to the PRINTER SETUP icon, and press ENTER. Use the ARROW buttons to scroll to the Utilities menu and press ENTER. Using the ARROW buttons, scroll to Menu Mode =. Select Full (if needed) and press the BACK button to return to the main menu.
- Scroll to the Utilities menu, and press Enter.
- Simultaneously press the Up Arrow and Enter keys.
- Use the Arrow buttons to scroll to Service Calibrations and press Enter.
- In the Service Calibrations menu, scroll to 7 Calibrations Backup and press Enter.
- Select Electronics Module Repl, and press Enter.
- Select ACCEPT to continue the Calibrations Backup.
- Press Enter when Calibrations Backup is complete.
- Following the calibration, turn the printer off then on and verify functionality.
Multi-roll feeder disassembly
Only remove the corresponding side cover of the multi-roll that requires maintenance. For example, only remove the right side cover of multi-roll if only the right end cover of the printer needs to be removed. Follow the steps listed below to gain access to the printer and complete the necessary service.
NOTE: Only ONE CE needs to be dispatched to perform service on a 1000 series printer attached to a multi-roll feeder.
Removing the multi-roll feeder left side cover
WARNING: Turn both the printer and the multi-roll feeder off and disconnect them from the power source prior to performing any maintenance.
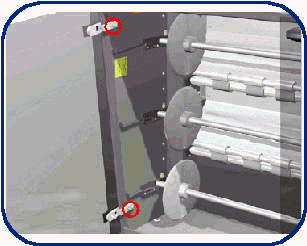
- Open the left door of the multi-roll feeder.
- Loosen the two screws that secure the left door to the multi-roll feeder (see Figure 1).
- Remove the left door.
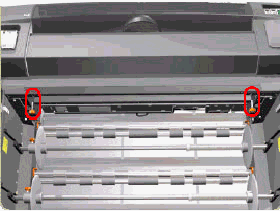
- Remove the two orange star screws that secure the front top-cover to the multi-roll feeder (see Figure 2).
- Remove the multi-roll feeder top cover.
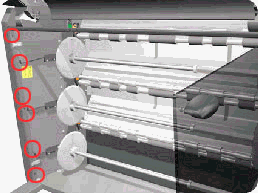
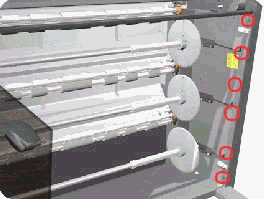
- Remove the six T-20 screws that secure the left side cover to the multi-roll feeder from the front (see Figure 3).
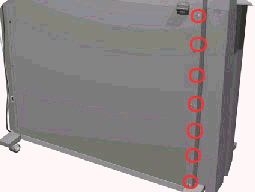
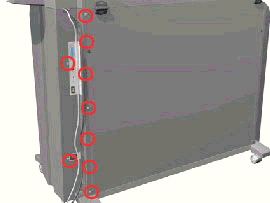
- Remove the seven T-20 screws that secure the left side cover to the multi-roll feeder from the rear (see Figure 4).
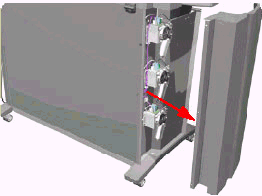
- Remove the left side cover (see Figure 5).
Removing the multi-roll feeder right side cover
WARNING: Turn both the printer and the multi-roll feeder off and disconnect them from the power source prior to performing any maintenance.
- Remove the right door and front top cover from the multi-roll feeder (follow Steps 1 - 5 of the previous section and remove the right door instead of the left).
- Remove the six T-20 screws that secure the right side cover to the multi-roll feeder from the front (see Figure 6).
- Remove the nine T-20 screws that secure the right side cover to the multi-roll feeder from the rear (see Figure 7).
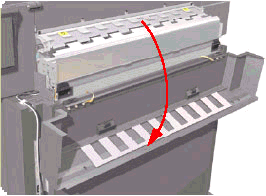
- Open the rear top cover (see Figure 8).
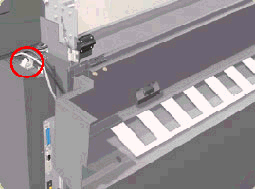
- Release the cable attached to the top of the right side cover (see Figure 9).
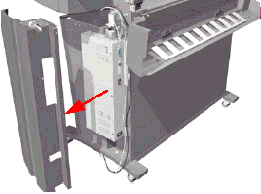
- Remove the right side cover (see Figure 10).
Installing covers
- the procedures listed above, but in reverse order.
Copyright Hewlett-Packard Co. 2001
This information is subject to change without notice and
is provided "as is" with no warranty.
Hewlett-Packard shall not be liable for any direct,
indirect, special, incidental or consequential damages
in connection with the use of this material.

Back
to TWI Documents Library Index Page


![]()
![]()
