Did this site save
(or help earn) you money?
Say thanks with a
small donation.
|
The
TWI Designjet Documents library presented here as a courtesy of
ComputerCareOnline.com
The owners of this website have no affiliation to Hewlett Packard nor do we
claim to represent HP
in any way shape or form.
Return
to TWI Documents Library Index Page
|

In this document:
Document number: BPP90049
Last updated: 07-Aug-2002
Minimum skill level: 2
System errors 0A0050 and 0A0060 during initialization indicate the printer has detected an ink leak. The most common cause of a leak is the
Ink Tube
System. Follow the steps listed below to accurately troubleshoot the issue, and replace the appropriate parts.
NOTE: If the printer is installed on a Multi-Roll feeder accessory, some Multi-Roll disassembly is required to gain access to the printer. Instructions for Multi-Roll disassembly are listed at the bottom of this document for reference.
Parts required (part numbers are subject to change)
Troubleshooting steps
If any of the troubleshooting steps listed below solve the problem, attempt to verify printer functionality by printing several internal prints. If functionality is verified, no additional parts should be replaced.
- Turn the printer on and verify system error 0A0050 or 0A0060 appears on the front panel display.
- If no error appears on initialization, attempt to verify printer functionality.
- If error appears, continue with the remaining steps.
- Turn the printer off.
- Open the
top
cover.
- Using paper towels or cloth, wipe top surface of rear tube guide and check for ink.
- If a leak is detected, replace
Ink Tube System and clean the Ink Leak Detector reservoir
(refer to pg. 8-53 of the Service Manual).
- Following replacement, perform the Calibrations Backup as described below. If problems persist or no problems are found, continue with the remaining steps.
- Turn on the printer and check if error re-appears.
- If no error, attempt to verify functionality.
- If error re-appears, replace Ink Leak Detector System (refer to pg. 8-60 of the Service Manual).
- Following replacement, turn the printer on and check for error during initialization.
- If no error, attempt to verify functionality.
- If error re-appears continue with the remaining steps.
- Turn the printer off.
- Open the window.
- Using paper towels or cloth, wipe the inside track of Front Guide Assembly.
- If ink is detected, replace
Ink Tube system
(refer to pg. 8-53 of the Service Manual) and perform the Calibrations Backup as described below. If problems persist or no problems are found, continue with the remaining steps.
- Check if the Front Tube Guide bends out at an angle, approximately 8 inches to the right of the left cover.
- If it does bend out at an angle, replace with the redesigned Front Tube Guide (which is straight across entire length).
- Check carriage area for ink leak.
- If ink is detected, replace
Ink Tube System
(refer to pg. 8-53 of the Service Manual) and perform a Calibrations Backup (listed below). If problems persist or no problems are found, continue with the remaining steps.
- Open the door behind right cover (as viewed from rear of printer).
- Check
ink tubes running to each cartridge location for leaks.
- If leak is detected, check that the ink tubes are well seated into their connector flanges at each cartridge connector location.
- If tubes were already well seated into the connector flanges, replace
Ink Tube System
(refer to pg. 8-53 of the Service Manual) and perform the Calibrations Backup as described below.
- If the error reappears, replace the
Electronics module
(refer to pg. 8-53 of the Service Manual) and perform the Calibrations Backup and Pen Alignment calibration as described below.
- Run several internal test prints to verify the ink leak has been corrected.
Calibrations backup
NOTE: Printer menu mode must be set to Full to access the Service Tests submenu. To verify, at the Ready prompt, scroll to the Printer Setup icon, and press ENTER. Use the ARROW buttons to scroll to the Utilities menu and press ENTER. Using the ARROW buttons scroll to Menu Mode =. Select Full (if needed) and press the BACK button to return to the main menu.
- With the printer turned on, scroll to the Printer Setup Menu (Icon of printer in lower right side of the front panel display) and press ENTER.
- Scroll to the Utilities menu and press ENTER.
- Simultaneously press the UP and ENTER buttons.
- Use the ARROW buttons to scroll to Service Calibrations and press ENTER.
- In the Service Calibrations menu, scroll to 7 Calibrations Backup and press ENTER.
- Select Electronics Module Repl, and press ENTER.
- Select Accept to continue the Calibrations Backup.
- Press ENTER when Calibrations Backup is complete.
- Following the calibration, turn the printer off then on and verify functionality (if Electronics Module is replaced, perform the Pen Alignment calibration below, before verifying functionality).
Pen alignment
- In the Service Tools submenu scroll to the 8. Pen Alignment and press ENTER.
- Scroll to Accept and press ENTER.
- If paper is not loaded the printer will prompt for installation of paper; load as needed.
NOTE: Do not use Clear Film, Vellum or Natural Tracing paper when performing a Pen Alignment Calibration.
- The printer will begin the Pen Alignment and display the time remaining to complete the calibration.
- When the calibration is complete press ENTER to continue.
- Following the calibration, turn the printer off, then on and verify functionality.
Multi-Roll feeder disassembly
Only remove the corresponding side cover of the Multi-Roll that requires maintenance. For example, only remove the right side cover of Multi-Roll if only the right end cover of the printer requires removal to complete the necessary service. Follow the steps listed below to gain access to the printer to complete the necessary service.
NOTE: Only one CE needs to be dispatched to perform service on a 1000 series printer attached to a Multi-Roll feeder.
Removing the Multi-Roll feeder left side cover
WARNING: Turn both the printer and the Multi-Roll feeder off and disconnect them from the power source prior to performing any maintenance.
- Open the left door of the Multi-Roll feeder.
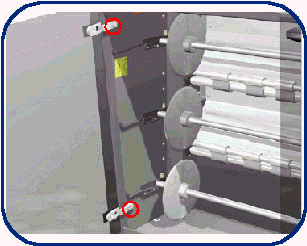
- Loosen the two screws that secure the left door to the Multi-Roll feeder (see Figure 1).
- Remove the left door.
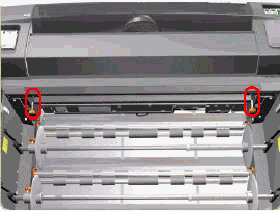
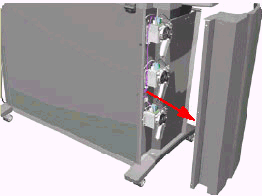
- Remove the two star screws (Orange) that secure the Front top-cover to the Multi-Roll feeder (see Figure 2).
- Remove the Multi-Roll feeder top cover.
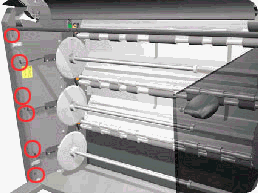
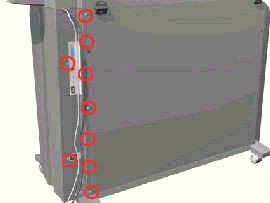
- Remove six T-20 screws that secure the left side cover to the Multi-Roll feeder from the front (see Figure 3).
- Remove the seven T-20 screws that secure the left side cover to the Multi-Roll feeder from the rear (see Figure 4).
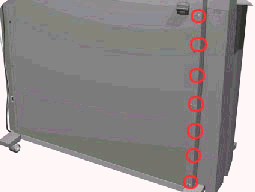
- Remove the left side cover (see Figure 5).
Removing the Multi-Roll feeder right side cover
WARNING: Turn both the printer and the Multi-Roll feeder off and disconnect them from the power source prior to performing any maintenance.
- Remove the Right door and Front top cover from the Multi-Roll feeder (follow steps 1 through 5 of the previous section and remove the right door instead of the left).
- Remove Six T-20 screws that secure the right side cover to the Multi-Roll feeder from the front (see Figure 6).
- Remove nine T-20 screws that secure the right side cover to the Multi-Roll feeder from the rear (see Figure 7).
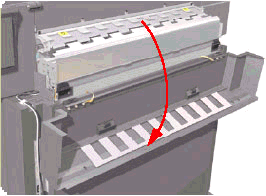
- Open the Rear Top cover (see Figure 8).
Figure 8: Rear Top cover
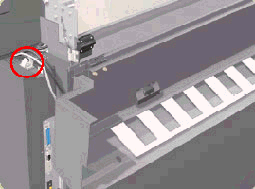
- Release the cable that is attached to the top of the right side cover (see Figure 9).
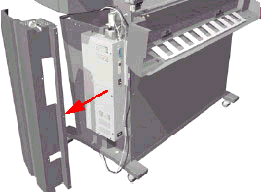
- Remove the right side cover (see Figure 10).
Installation of covers
Follow the procedures listed above in reverse order.
Copyright Hewlett-Packard Co. 2001
This information is subject to change without notice and
is provided "as is" with no warranty.
Hewlett-Packard shall not be liable for any direct,
indirect, special, incidental or consequential damages
in connection with the use of this material.